Connecting Different Biometric Sensors to AWS
Connecting Different Biometric Sensors to AWS
By Derrick Cheng
In our increasingly interconnected world, AWS Internet of Things (IoT) provides us with an easy way to connect our devices to the cloud. This blog post will detail connecting different biometric sensors to send data to AWS IoT for the Health Platform project. Individuals on the autism spectrum are often at risk of experiencing unpredictable epileptic seizures. Therefore, this project collects biometric and environmental gas sensor data from various sensors, then displays it all on one dashboard to be used to predict epileptic seizures before they occur. I worked with 3 different biometric sensors, an Android wearOS watch, an Apple Watch, and a Biostrap EVO Wristband, each collecting different types of sensor data. I’ll be talking about some of the challenges I faced while working with these devices as well as how I solved them.

Android wearOS watch: Mobvoi TicWatch E2
The first device I worked with was a Mobvoi TicWatch E2 which ran wearOS and the app was built using Kotlin. The first thing to do was connect the watch to AWS IoT so it could begin sending data. The first challenge to address was providing proper credentials for the app to connect to IoT without the need for any user login (since needing a login on a watch app would not really make any sense). To solve this, within the AWS account, an Unauthenticated Cognito Identity Pool with the proper IAM credentials for access to IoT was provisioned. Since the Identity Pool is unauthenticated, as long as the app has the pool ID, IoT will be accessible with the associated IAM role without needing to log in. Apart from this issue, the rest of connecting to IoT was pretty simple. AWS provides a Software Development Kit (SDK) for Kotlin which works for wearOS as well as Android. An MQ Telemetry Transport (MQTT) client was set up with the credentials received from the Cognito Pool and the IoT Endpoint. With this, the MQTT client is then able to connect to IoT.
Once the connection to IoT was established, the next step was getting the sensor readings from the watch. The Android developer docs detailed the different sensor types that could be retrieved from the watch. For the purposes of this project, the chosen sensor types were Heart Rate, Heart Beat, Temperature, Steps, and Accelerometer as these could be relevant metrics for seizure detection. Accessing these sensor types was pretty simple, all that had to be done was have the app register listeners for each sensor type. However, although the android developer docs list all the available sensor types, this does not guarantee that the watch will have that sensor. Unfortunately, the TicWatch did not have Heart Beat or Temperature sensors, so only the remaining 3 sensor types could be worked with.
Finally, the last step was sending the sensor readings to AWS. Here there was an issue where sending all the sensor readings one after another would sometimes cause messages to get dropped before reaching IoT. Trying to add some delay between message sends by using thread sleep crashed the watch app due to the limited amount of threads available. Instead, using a Handler which would allow code execution to be delayed from running by X seconds was a better solution. Scheduling the messages to be sent 1 second apart and everything worked fine after that.
Apple Watch and iPhone
The sponsors of this project really wanted the ability to get Heart Rate Variability readings for use in seizure predictions, something available on the Apple Watch and not the Android Watch. Therefore, midway through the development process, the decision was made to switch wearables from the wearOS watch to the Apple Watch. The watchOS app was built using Swift.
Unlike the wearOS watches, watchOS does not have any support for MQTT and AWS IoT. Instead, an iOS app needs to be developed as well to receive the data coming from the watch since iOS did support the AWS IoT SDK. The SDK has to be integrated into the project, so a dependency manager called Cocoapods was used to install the AWS IoT dependencies.
The Apple Watch automatically sends data to Apple’s health data store called HealthKit. Within the iOS app, HealthKit access permissions are requested which will allow Heart Rate, Heart Rate Variability, and Steps data coming from the Apple Watch to be retrieved.
Establishing a connection to IoT was done in roughly the same way as for the wearOS watch, but there were some issues with the connection for the iOS app. When the device is locked or moved to the background, MQTT is not able to maintain a connection to IoT. Since it is not feasible to have a phone constantly unlocked, there instead needed to be a way for the app to run in the background or while the device is locked. To solve this, Background Tasks were used. Background Tasks allow an app to be scheduled to run after X seconds, where at that time the app will be given 30 seconds of foreground execution time. This allows the app to send a batch of data to AWS every once in a while regardless of if the device is locked or the app is in the background. There is a bit of a caveat though, although a time can be scheduled for when the app will run, there is no guarantee that the app will run at that time. If the app is set to run in an hour, the iOS system will schedule the task and choose a time anytime after an hour to run the app. The user has no control over when the system will decide to run the app. A workaround to have the Background Task trigger relatively close to the set time was to set the interval at a less frequent rate; every 6 hours for example.
Biostrap EVO Wristband
Although the Apple Watch was able to get Heart Rate Variability readings, it was rather infrequent with one Heart Rate Variability reading coming in about every 2 hours. The Biostrap EVO Wristband is a wearable device that gives much more frequent Heart Rate Variability readings, sometimes even able to get readings every 5 to 10 minutes. The Biostrap API was used to integrate the Biostrap data with our Health Platform dashboard.
It was pretty simple to integrate the API with the Health Platform dashboard, the only issue I ran into was the user_id parameter for querying biometric data. The user_id could not be found anywhere for a while because it is not available on the Biostrap dashboard or in the app. Eventually, it was found out that a query had to be run first for a user with their registered email, which would then return user information where one of the parameters was the user id. The rest of it was pretty straightforward, a Lambda function was set up to automatically run every 5 minutes, where it would query for new data from all Biostrap devices.
Conclusion
Going into this project, I knew nothing about IoT or mobile/wearable app development. Now that I’ve finished developing, I’m really glad I got to work with IoT. Given the multitude of devices that connect through IoT nowadays, my work on this project will be valuable experience for the future. Working with different IoT sensors has really piqued my interest in learning more about IoT, as I believe it is an important concept in our increasingly interconnected world. Additionally, learning to code in Swift and Kotlin from developing the apps will also be useful experience for mobile development in the future. The possibilities of IoT are really limitless as there are a vast number of different devices that could connect to the cloud. Hopefully, my experience makes you want to work with IoT too!
If you would like to learn how to connect an iOS App to AWS IoT, follow the guide below.
Connecting an iOS App to AWS IoT and Publishing Messages via MQTT
Step 1: Create a Cognito Unauthenticated Identity Pool
First, an Unauthenticated Cognito Identity Pool has to be created so that the app can be provisioned with the proper credentials to access AWS IoT. Two ways have been provided to create this resource, either manually through the AWS console, or through code using Typescript CDK.
Creating the Identity Pool through the AWS console:
- Navigate to the Cognito Page in the AWS console.
- Click on Manage Identity Pools and then click on Create New Identity Pool. For the new Cognito Interface, click Federated Identities and then Create New Identity Pool.
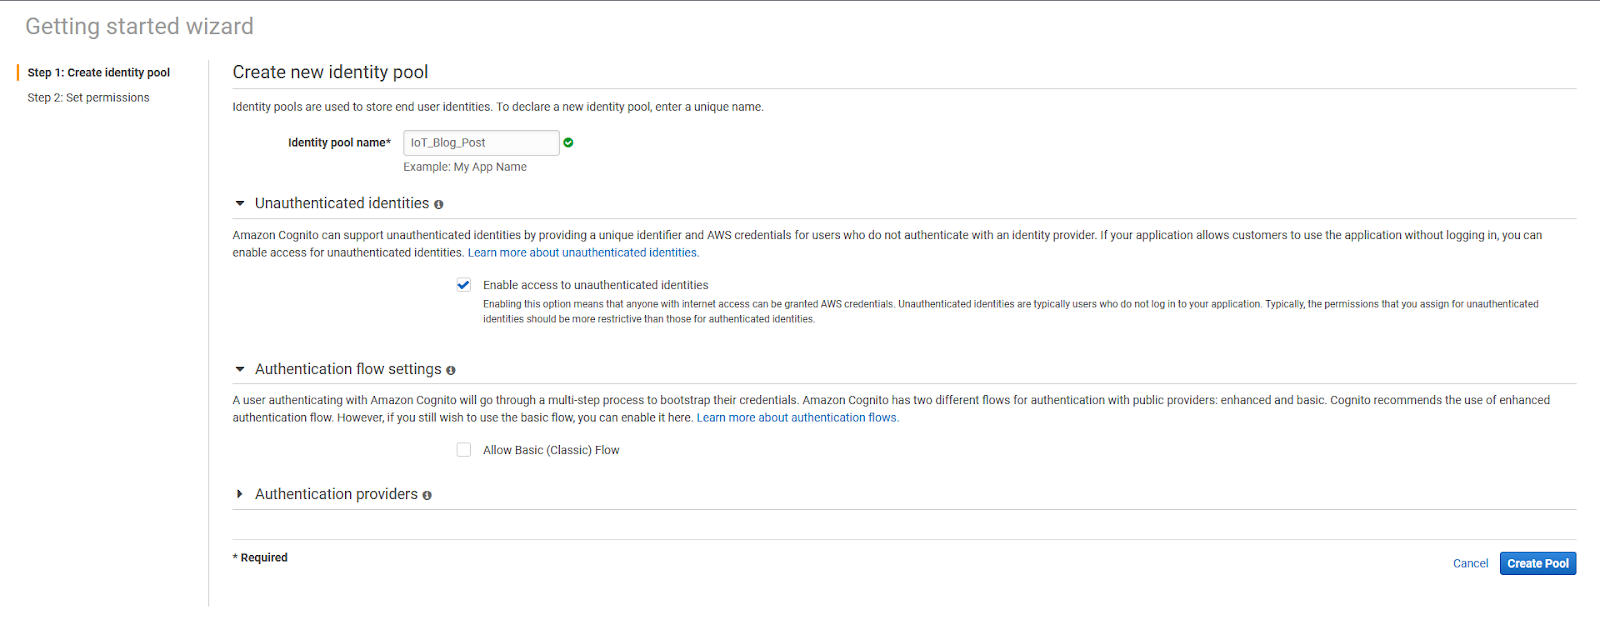
- Fill in an Identity Pool Name, and check Enable access to unauthenticated identities.
- Click allow on the next page and make note of the Unauthenticated Role name that is created. This will be needed in the next step.
Alternatively, an example of creating the Identity Pool using Typescript CDK:
const cognitoIdentityPool = new CfnIdentityPool(this, 'HealthPlatformIdentityPool', {

            identityPoolName: 'HealthPlatformIdentityPool',

            allowUnauthenticatedIdentities: true,

        });
Step 2: Edit Cognito Unauthenticated IAM Role Permissions
The permissions of the IAM role that was just created need to be edited so that it will allow the app to access IoT. This role is attached to the Cognito Identity Pool so that when credentials are provided for the app, the credentials will be reflective of the permissions that are defined here in this IAM role. Again, two ways have been provided to create this resource, either manually through the AWS console, or through code using Typescript CDK.
Editing Role through the AWS Console:
- Navigate to the IAM page in the AWS console and click Roles from the sidebar.
- Search for the Unauthenticated Role created in the previous step.
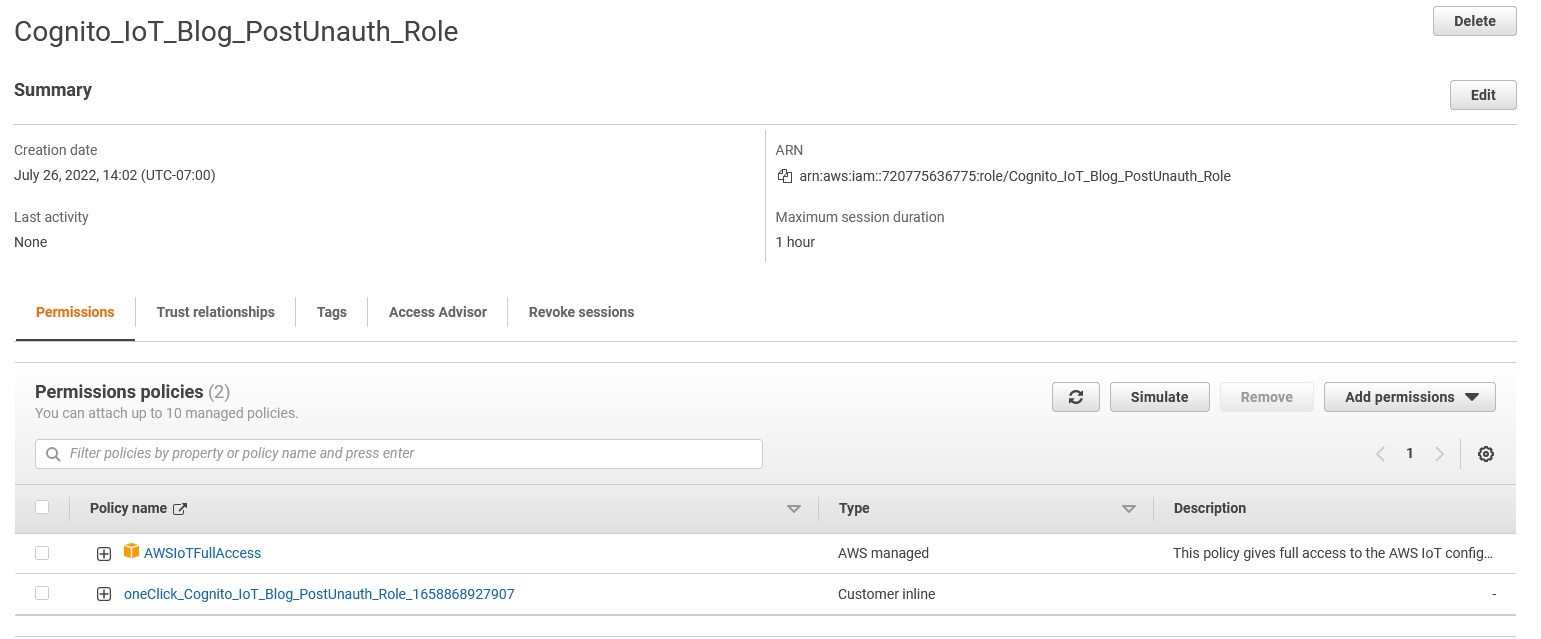
- Click Add Permissions, then Attach Policies, then add the AWS Managed Policy “AWSIoTFullAccess”
- The Role should now look like the following image
Alternatively, an example of attaching the Role using Typescript CDK:
const cognitoUnauthourizedRole = new Role(this, 'CognitoUnauthourizedRole', {

            roleName: "CognitoUnauthourizedRole",

            assumedBy: new FederatedPrincipal(

                "cognito-identity.amazonaws.com",

                {

                    StringEquals: {

                        "cognito-identity.amazonaws.com:aud": cognitoIdentityPool.ref

                    },

                    "ForAnyValue:StringLike": {

                        "cognito-identity.amazonaws.com:amr": "unauthenticated"

                    }

                },

                "sts:AssumeRoleWithWebIdentity"

            ),

            description: 'Role for sensor devices',

            maxSessionDuration: cdk.Duration.seconds(3600),

            managedPolicies: [

                ManagedPolicy.fromAwsManagedPolicyName("AWSIoTFullAccess")

            ]

        });

        cognitoUnauthourizedRole.addToPolicy(new PolicyStatement( {

            effect: Effect.ALLOW,

            resources: ["*"],

            actions: [

                "mobileanalytics:PutEvents",

                "cognito-sync:*"

            ]

        }));

        const identityPoolRoleAttachment = new CfnIdentityPoolRoleAttachment(this, 'IdentityPoolRoleMapping', {

            identityPoolId: cognitoIdentityPool.ref,

            roles: {

                unauthenticated: cognitoUnauthourizedRole.roleArn

            }

        });
Step 3: Make Note of AWS Constants
Now that the Cognito Pool and the associated IAM Role have been created all the needed AWS resources have been created. However, before moving on, there are some constants within the AWS account that will be needed later on.
** Make sure the console is in the same region in which the resources in the previous steps were provisioned before proceeding **
IoT Endpoint: IoT Core -> Settings -> Device Data Endpoint
Cognito Pool ID: Cognito -> Manage Identity Pools/Federated Identities -> YourIdentityPoolName -> Edit Identity Pool -> Identity pool ID
Region: The region being used
Step 4: Installing AWS IoT dependencies in the iOS App
Since AWS libraries are not directly available through XCode, they need to be downloaded and installed through a third-party dependency manager. This guide describes the process using Cocoapods but you can feel free to use another dependency manager.
Follow the instructions at https://cocoapods.org/pods/AWSIoT#cocoapods to install Cocoapods.
Edit the Podfile to look like the following. Be sure to edit it according to the project name and desired iOS Version.
platform :ios, 'Your_iOS_Version'

target 'Your_Project_Name' do

  use_frameworks!

  pod 'AWSIoT'

end
If there is an error while running pod install on a newer Mac with an M series CPU, this is because M series CPUs don’t use x86 architecture. Therefore, run the following commands instead of pod install.
sudo arch -x86_64 gem install ffi

arch -x86_64 pod install
Step 5: Connect the iOS App to AWS IoT
Now comes the fun part, establishing a connection to IoT and publishing messages to the IoT endpoint.
Start by creating a new file called AWSConstants, which will hold some of the constants specified in Step 3.
import Foundation

struct AWSConstants {

    //Cognito -> Manage Identity Pools -> HealthPlatformIdentityPool -> Edit Identity Pool -> Identity pool ID

    static let COGNITO_POOL_ID = ""

    //IoT Core -> Settings -> Device data endpoint

    static let IOT_ENDPOINT = ""

    //Default topic name for this application, do not change this unless you have changed the topic name in HealthPlatformIoTStack

    static let IOT_TOPIC = "iot_device_analytics"

}
For now, leave the Cognito Pool ID and IoT Endpoint as empty strings, these will be filled in the next step. As for the IoT Topic, specify a topic name to be used.
Next, create a new class called AWSViewModel which will handle connecting and publishing to IoT. Start with obtaining credentials from the Cognito Pool created earlier, as well as establishing an IoT configuration for the IoT Data Manager. The Data Manager will be handling all the data transfer that goes on between the app and IoT, whether that be publishing, subscribing, etc.
import Foundation

import AWSIoT

class AWSViewModel {

    var connectionStatus = "Not Connected"

    let cognitoCredentials: AWSCognitoCredentialsProvider

    let cognitoConfiguration: AWSServiceConfiguration

    let iotEndpoint: AWSEndpoint

    let iotConfiguration: AWSServiceConfiguration

    var clientId: String

    //setup your cognito credentials and iot endpoint

    init() {

        cognitoCredentials = AWSCognitoCredentialsProvider(regionType:.USWest2, identityPoolId: AWSConstants.COGNITO_POOL_ID)

        cognitoConfiguration = AWSServiceConfiguration(region:.USWest2, credentialsProvider: cognitoCredentials)

        AWSIoT.register(with: cognitoConfiguration, forKey: "kAWSIoT")

        iotEndpoint = AWSEndpoint(urlString: "wss://\(AWSConstants.IOT_ENDPOINT)/mqtt")

        iotConfiguration = AWSServiceConfiguration(region: .USWest2, endpoint: iotEndpoint, credentialsProvider: cognitoCredentials)

        AWSIoTDataManager.register(with: iotConfiguration, forKey: "kDataManager")

        clientId = ""

        self.getAWSClientID()

    }

}
Next, in order to authenticate with IoT, a Client ID will need to be retrieved using the credentials provided by the Cognito Pool.
func getAWSClientID() {

            cognitoCredentials.getIdentityId().continueWith(block: { (task:AWSTask<NSString>) -> Any? in

                if let error = task.error as NSError? {

                    print("Failed to get client ID => \(error)")

                    return nil

                }

                self.clientId = task.result! as String

                print("Got client ID => \(self.clientId)")

                self.connectToAWSIoT()

                return nil

            })

        }
Now with a client ID, we can connect to IoT.
func connectToAWSIoT() {
func mqttEventCallback(_ status: AWSIoTMQTTStatus ) {
switch status {

                case .connecting: connectionStatus = "Connecting"

                case .connected: connectionStatus = "Connected"

                case .connectionError: connectionStatus = "Reconnecting"

                case .connectionRefused: connectionStatus = "Connection Refused"

                    connectToAWSIoT()

                case .protocolError: connectionStatus = "Protocol Error"

                    connectToAWSIoT()

                case .disconnected: connectionStatus = "Disconnected"

                    connectToAWSIoT()

                case .unknown: connectionStatus = "Unknown"

                default: connectionStatus = "Not Connected"

                }

            }

            DispatchQueue.global(qos: .background).async {

                do {

                    print("Attempting to connect to IoT device gateway with ID = \(self.clientId)")

                    let dataManager = AWSIoTDataManager(forKey: "kDataManager")

                    dataManager.connectUsingWebSocket(withClientId: self.clientId,

                                                      cleanSession: false,

                                                      statusCallback: mqttEventCallback)

                }

            }

        }
Finally, to publish a message to IoT, call the publishMessage function elsewhere within the iOS app. This will publish a message with the Topic Name that was specified earlier. The Quality of Service (qoS) can be adjusted to the needs of the app here.
func publishMessage(message: String!) {

      let dataManager = AWSIoTDataManager(forKey: "kDataManager")

        dataManager.publishString(message, onTopic: AWSConstants.IOT_TOPIC, qoS: .messageDeliveryAttemptedAtLeastOnce)

    }
Step 6: Adding a Settings Page For AWS Constants
Recall from the beginning of step 5, in the AWSConstants file, IoT Endpoint and Cognito Pool ID were left blank. While of course, these constants could be hard coded into the app, let’s instead make the value dynamic based on a user’s input.
- In XCode, select File -> New -> File and select Settings Bundle
- Choose a name for the Settings Bundle
- From the newly created Setting Bundle, open the Root.plist file.
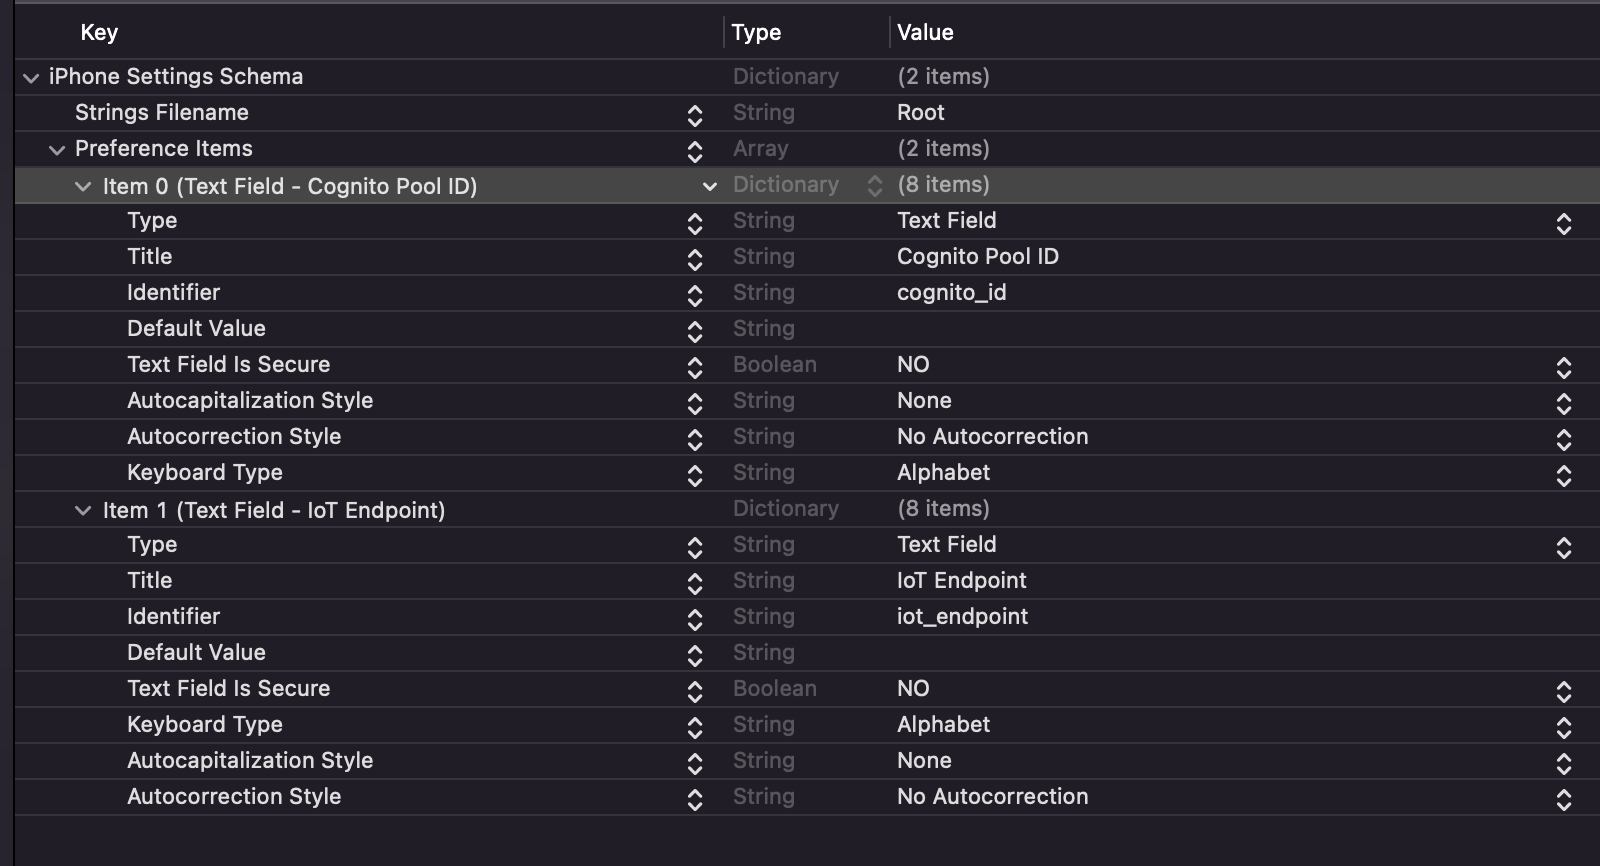
- Create two user input text boxes with the following code, one for the IoT Endpoint and one for the Cognito Pool ID. The Root.plist file should look like this:
- Head back over to the AWSConstants file created earlier and update the constants to equal the user inputs from the Settings page.
import Foundation

struct AWSConstants {

    //Cognito -> Manage Identity Pools -> HealthPlatformIdentityPool -> Edit Identity Pool -> Identity pool ID

    static let COGNITO_POOL_ID = (UserDefaults.standard.string(forKey: "cognito_id") ?? "") as String

    //IoT Core -> Settings -> Device data endpoint

    static let IOT_ENDPOINT = (UserDefaults.standard.string(forKey: "iot_endpoint") ?? "") as String

    //Default topic name for this application, do not change this unless you have changed the topic name in HealthPlatformIoTStack

    static let IOT_TOPIC = "iot_device_analytics"

}- Build and run the app. There should now be a settings page where the IoT endpoint and Cognito Pool ID can be input!
Photo by Luke Chesser on Unsplash