How To Publish an iOS App to TestFlight
How To Publish an iOS App to TestFlight
You finally fixed all the bugs that have been breaking your app and can finally test out the product you have been working on. You want to get your colleagues and friends to test it out as well and give feedback but you don’t want to have to manually install the app one by one onto their phones but you also don’t want to go through the hassle of publishing your app to the App Store making it open to the public. TestFlight solves all of these concerns by providing a simple platform to test your beta application and collect feedback.
In the context of the UBC CIC, TestFlight was an essential tool to both internally and externally test the two iOS apps that Timothy Jin developed. Timothy writes, in both projects, TestFlight was used to gather feedback including improvements, suggestions, or bugs from co-workers and staff at the UBC CIC. On the client side, TestFlight allowed us to share our apps with the researchers and doctors we worked with for our projects. Since we were connecting virtually with our clients, TestFlight was a crucial tool in delivering our apps over the air to our clients for testing and feedback.
TestFlight allows you to upload beta versions of an app to their platform to share with specific testers. Apps builds uploaded to TestFlight expire after 90 days and can be managed from the App Store Connect web console. Testers can install the TestFlight app on their iOS device. From the TestFlight app, testers are able to install the beta build of the app, test it out, and provide feedback for the developer.
1. Prerequisite
Before we can publish our app to TestFlight, we will need to have a few things set up:
1. A Functioning App – To submit an app to TestFlight, you will need a complete and functioning app. The TestFlight submission review process will involve the testing of your app’s features which should be properly functioning.
2. Enrollment in the Apple Developer Program – To gain access to services like TestFlight, you must have an Apple Developer account that is enrolled in the Apple Developer Program.
3. Xcode: To publish your app, you will need to have Apple’s integrated development environment installed. Xcode will allow you to configure all the necessary settings within your app and archive your app to submit to TestFlight.
2. Register a Bundle ID
To publish an app, we will first need to register a Bundle ID. A Bundle ID is a unique identifier that is used to identify apps in the Apple ecosystem.
1. To get started, head to the Identifiers Page in your Apple Developer Account page.
Figure 1. A screenshot of the Apple Developer webpage, under Identifiers
2. Click on the + icon next to Identifiers to create a new Bundle ID.
3. Select App ID > App.
4. Enter a description and an Explicit unique Bundle ID.
5. Select any Capabilities and Services your app may have or use.
6. Click Continue > Register.
3. Create a New App in App Store Connect
App Store Connect is the place where you can manage all your iOS apps and projects. In this section we will start a new project on App Store Connect and link it to the Bundle ID we created in the previous section.
1. In the Apps section of App Store Connect, click the + icon next to Apps and select New App to create a new app.
2. You will now be asked to fill out the following pieces of information:
Platforms – The platforms your app will be supported on
Name – The name of your application
Bundle ID – The Bundle ID of your application. Select the Bundle ID we created in the previous step
SKU – This is a unique identifier for your app that is used in App Store Connect
3. Once everything is filled out, click Create. You should now be able to see your newly created app in the Apps section.
4. Click on your app and head to the TestFlight tab. Fill out the information under General Information > Test Information
4. Configure Xcode Project Settings
Xcode is Apple’s integrated development environment that is used to develop, test, and distribute projects to all Apple platforms. In this section, we will configure our app in Xcode and link it to the project we have just created in App Store Connect.
1. Open your project in Xcode and select your Xcode project in the navigator tab on the left.
2. In the General tab, configure your app with the appropriate settings.Figure 3. Apple’s integrated environment
3. Head to the Signing & Capabilities tab and sign in with your Apple Developer account if you have not done so already.
4. Under Signing, select Automatically manage signing and enter in the Bundle Identifier we created in Section 2.
5. Create a Build
1. In the General tab, set an appropriate Version and Build number.
2. Set the Target to be Runner > Any iOS Device.
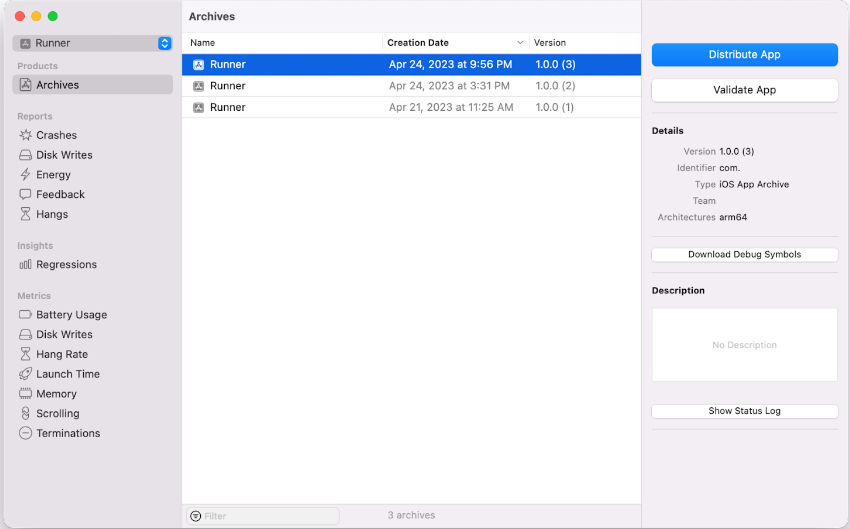
3. In the Xcode menu bar at the top, select Product > Archive and wait for the archive to complete.
4. A window showing all your archives should appear once the archive is complete. Select your most recent archive and click Distribute App.
5. Go through the following steps of the distribution selecting the appropriate settings for your app. Once complete, your app should be uploaded to App Store Connect.
6. Release on TestFlight
1. Once the Xcode upload is complete, navigate to your app page in App Store Connect. Under Builds > iOS, there should be a list of builds uploaded from Xcode. Builds may take a few minutes to appear here.
2. Once the uploaded build appears, click on it, fill in the Test Details, and add Testers by their Apple ID.
3. Once a tester is added, the app should be automatically submitted for review. The reviewing process could take a few days to process.
4. Once the build is processed, testers will receive a code in their email for TestFlight.
7. Redeem Your App on TestFlight!
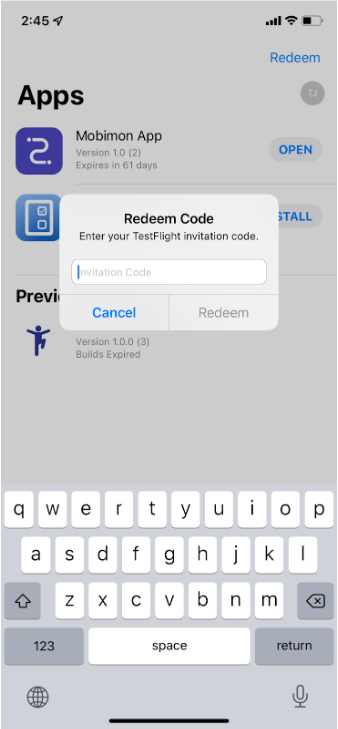
1. Testers can then install the TestFlight App from the Apple App Store on an iPhone running iOS 14.0 or later and sign in with their Apple ID.
2. In TestFlight, testers can press the Redeem button and enter the TestFlight code from their email. The app should then appear in TestFlight under Apps and testers will be able to install the build.
3. Builds uploaded to TestFlight have a lifespan of 90 days and will expire after that. To create another build of the app to upload to TestFlight after the 90 day period, repeat the steps in sections 5 and 6.
Summary
In summary, TestFlight offers a powerful and efficient way to test your iOS app with select users without the hassle of deploying a full public release. By following these steps, you can seamlessly navigate through the process of preparing, uploading, and distributing your beta app, all while collecting valuable feedback to refine your product. Utilizing TestFlight not only streamlines testing but also ensures a more polished final product for your users. Happy testing!